Easy Hazelnut Spread in Minutes

Make the Best Hazelnut Spread in Minutes
If there is one thing that I am absolutely obsessed with, it is hazelnut spread. It’s smooth, creamy, nutty, and best of all–made with chocolate!
Not to mention, it’s versatile and can be used in so many ways. Whether on just a piece of toast, slathered on pancakes, or even atop a cup of greek yogurt.
It’s no wonder that Nutella is sold every 2.5 seconds throughout the world. It tastes amazing! I’ve always wondered how to make hazelnut spread at home. Since hazelnut spread is so popular, I decided to try my hand at making my very own.
I recently had the chance to try out a Breville Super Q blender. It kinda rocks because it can handle what most other blenders can’t. With the help of my Breville and just 4 ingredients, I was able to make the best hazelnut spread in just 8 minutes.
Read on for the full step-by-step guide on how to make your own hazelnut spread in just minutes!

Things You Will Need:
- 3 cups of roasted hazelnuts
- 1 cup of milk chocolate chips
- 1 cup of dark chocolate chips
- 1/4 cup of peanut oil
- 1 tsp of sugar, stevia or xylitol (optional)
- Breville Super Q
- mason jars
- cookie sheet or baking tray (if needed)
*if you do not want to use peanut oil, opt for extra-virgin coconut oil.

If you’ve been a long time follower, you know that I enjoy baking and cooking. To me, that means making yummy recipes that are easy to make and using powerful tools that save me time.
With the Breville Super Q, I am able to make so many different types of recipes. It has a powerful 1800 Watt motor, which is the highest possible motor rating. The 186mph blade tip speed under load made grinding our hazelnuts a breeze.
While smoothies are a given, you can make all types of desserts, ice cream, dips, your own nut butters, and even HOT soups. Yes, you read that right!

The first thing you need to do is roast your hazelnuts. If you’ve bought roasted hazelnuts, you can skip this step. To roast the hazelnuts, spread the raw hazelnuts on a baking sheet and bake at 275 degrees F. for 15-20 minutes. Let them cool.


Step 1:
Add 1/2 cup of peanut oil to blender. Then add 3 cups of the roasted hazelnuts. My Breville Super Q has 12-speeds and they are really easy to access.
With these speeds, I can blend nut & bean milks, fresh cocktails, finely milled flour, creamy dips, rich sauces, zesty dressings and freshly ground spices. So, blending our hazelnuts into a smooth butter was incredibly easy.


Step 2:
Start by using your blender at the first speed and then slowly increase it to top speed. Blend until smooth. Use the tamper to press the ingredients into the blades. We used a tamper and scraper to make sure we didn’t miss any nuts and that it was all blended smooth.
We started chopping with my Breville, then blending, and finally to puree. I’m not quite sure if that’s the best bet for making nut butters with the Breville Super Q but, it gave us the smoothest result. We briefly tried the frozen dessert setting, since we figured that it would handle the thickness.


Step 3:
After a minute or so when the smooth butter is formed, reduce the speed. If you have 10 speeds, reduce to 8 or if you have 12 speeds, reduce to 10.
Now it is time to add the chocolate. Slowly add 1 cup of milk chocolate to roasted hazelnut butter mixture. Add until completely blended. Then add 1 cup of dark chocolate chips to the mixture.
During this step, you can choose to add sugar or a sweetener of your choice. I didn’t add any since I used semi-sweet chocolate.
Once you’ve added all of the chocolate, increase speed to top speed and blend an additional 10-30 seconds. Then pour hazelnut spread into mason jars. Allow your hazelnut spread to cool and place them into the fridge to thicken.

Time to Enjoy
Seriously, if you love hazelnut spreads, making your own is satisfying. The fact that I made a batch within minutes and with only 4 ingredients is amazing.
Just make sure that you are using a high-quality blender that can handle the job. I can say that without a doubt, my new Breville Super Q made the cut.
Plus, it was really quiet with its noise suppression technology. The unique fan and motor tech reduce the noise for an improved blending experience. It’s an affordable addition to your kitchen arsenal (retails for $499.99) that really makes cooking easier.

One of our favourite ways to enjoy hazelnut spread is to slather it on toast and top it with bananas. We even make breakfast churros and they are always a hit with the girls.
The possibilities are endless, heck, I wouldn’t judge you if you enjoyed it by the spoonful.
I can’t possibly describe to you how great it tastes though. You have to taste it for yourself. I never imagined how just a few simple ingredients can pack so much flavour.

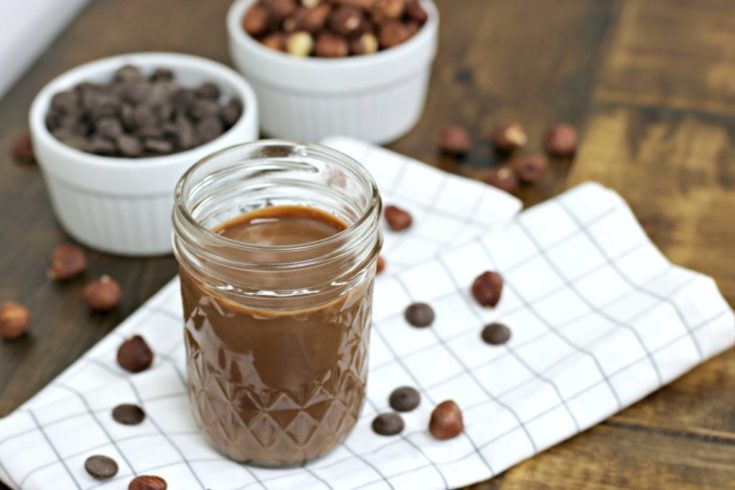
The Best Hazelnut Spread
This is a creamy, smooth, and perfectly sweet hazelnut spread. With only 4 ingredients, there's nothing to feel guilty about.
Ingredients
- 3 cups roasted hazelnuts
- 1 cup milk chocolate, (I used chocolate chips)
- 1 cup dark chocolate, (I used chocolate chips)
- 1/2 cup peanut oil, (you can opt to use extra virgin coconut oil)
Instructions
- Roast your hazelnuts. If you’ve bought roasted hazelnuts, you can skip this step. To roast the hazelnuts, spread the raw hazelnuts on a baking sheet and bake at 275 degrees F. for 10-15 minutes. Let them cool.
- Add 1/2 cup of peanut oil to blender. Then add 3 cups of the roasted hazelnuts.
- Start by using your blender at the first speed and then slowly increase it to top speed. Blend until smooth. Use the tamper to press the ingredients into the blades. I used a tamper and scraper to make sure I didn't miss any nuts and that it was all blended smooth.
- After a minute or so when the smooth butter is formed, reduce the speed. If you have 10 speeds, reduce to 8 or if you have 12 speeds, reduce to 10.
- Now it is time to add the chocolate. Slowly add 1 cup of milk chocolate to roasted hazelnut butter mixture. Add until completely blended. Then add 1 cup of dark chocolate chips to the mixture.
- During this step, you can choose to add sugar or a sweetener of your choice. I didn't add any since I used semi-sweet chocolate.
- Once you've added all of the chocolate, increase speed to top speed and blend an additional 10-30 seconds. Then pour hazelnut spread into mason jars. Allow your hazelnut spread to cool and place them into the fridge to thicken.

Make it World Hazelnut Spread Day Every Day
It just so happens that today, February 5th, is World Nutella Day. If you pick up the 4 ingredients in this recipe or have them in your pantry, you can make your own and celebrate!
If you’re in the market for a new blender, consider picking up the Breville Super Q now available at breville.com!
Believe me, it rocks!
Need more inspo? Check out 6 things you never knew you can do with hazelnut spread or try making these cute Poop Emoji cupcakes!
Do you love hazelnut spread and if you do, how do you enjoy it?
Let me know, til then–cheers m’deres!

PIN FOR LATER:

Note: This post is sponsored by Breville. All thoughts and opinions are honest and my own.

Nancy Polanco is a freelance journalist, lifestyle content creator, and editor of Whispered Inspirations. She is a proud Mom to Gabby and Michaela and partner and best friend to Darasak. Having worked as part of a health care team for almost a decade, Nancy is happy to be back to her passion. She is a contributor to the Huffington Post, TODAY’s Parents, and an Oprah Magazine Brand Ambassador.


I’m a huge Nutella fan so I love this recipe! Also, a blender that can blend hot soups sounds like a dream come true to me haha.
Makes life so much easier. The Breville is so awesome.
OK now, this sounds absolutely amazing! I love the idea of making your own as well. I am going to have to give this a try.
And the best part? It is so simple.
I love hazelnut spread! I always wind up buying it as an impulse buy. Not any more! I plan on making this so no more impulse buys!
WOOOOT. Enjoy, it is so good!
Oh wow I never thought about making my own chocolate spread! What a great idea, my kids love hazelnut spread but I don’t like the palm oil in the jars!
Yes, you can sub for peanut oil.
Could you sub for olive oil?
I haven’t tried it but, I heard others have subbed it.
So easy and better than Nutella I bet! I prefer to make things from scratch so I’ll be making this for the twins. They love hazelnuts. I love Breville products too!
Breville ROCKS. Yes, so easy and tastes amaze.
This seems like a recipe that just about anyone could easily do. It would be fun to make this with the kids. They’d love eating it that’s for sure!
Yes, it is so easy and delish.
This looks delicious. I wish I could make some but my son has an allergy. Bummer
Awww, I am sorry!
We have a hazelnut tree and live to make fresh butter. Will have to try your recipe
OMG, that is amazing–you are set for life.
This spread looks gorgeous! LOL! That’s a weird way to describe it but you captured it so well that I think it looks damn sexy!
Awww, why thank you–tastes great too.
Ahh, great to know I can make my own hazelnut spread like this! I love Nutella but it’s expensive here.
Hope you enjoy it!
People always look at me like I’m from outer space when I tell them this, but to this day I still have not tasted any brand of a chocolate-hazelnut spread. Maybe I’ll just try your recipe and put all that shame to an end. LOL
Hope you give it a whirl, you will not be disappointed. 🙂
Thank you for making me drool. I need to make this for sure. I just love this kind of spread.
Is it not THE best?
I never thought to make my own spread. This looks delicious! Thanks for sharing your recipe – I can think of so many things this would be great for!
My pleasure, hope you enjoy it!
I love hazel nut spread. I put it on everything from fruits to breads. My kiddos even enjoy hazelnut hot chocolate.
Yes, it is so good. ON EVERYTHING. Almost.
Now that is a powerful blender. My youngest daughter loves hazelnut spread. I bet she would love to have some that we made ourselves. Thanks for the recipe!
Yes! The blender rocks, it is so powerful!
Be right back! I am off to go buy some hazelnuts. This looks so good!
WOOT! Enjoy, hope you love it as much as we do.
I’d never even thought about making my own hazelnut spread. This looks easy enough. I like that you have control over the quality of the ingredients being used.
Yes, that is the best part.
Hazelnut spread without all of the added processed sugar? How awesome! I’m looking forward to saying goodbye to the store bought version.
Yes m’aam. It is delish!
Appreciated how thorough you were with all the pictures in walking us through all the steps of preparing this recipe. I really enjoyed reading through this post!
Thanks Tim! So happy you liked it.
I never thought about making hazelnut spread before, what a delicious treat this would be. Thanks for making it an easy recipe to follow.
Yes, so good, hope you give it a try.
My son would enjoy this on Ice Cream I believe and this evening when he comes in from school I will ask him.
Mmm, I love it with ice cream too.
I love Nutella, but rarely buy it. This recipe looks so easy and so delicious!
It is so tasty!
This looks so good! I am eager to try it, especially since it is semi low in sugar.
Yes, it is so good!
I can’t believe I can make hazelnut spread myself! I’m totally going to try this!
Umm, yesssss Heather, enjoy!
I love hazelnut spread, but I always buy it. I need to try making it myself soon.
So simple, Pam! You cannot go wrong.
Wow! Such a great recipe! I love that it was so quick to make, and only took 4 ingredients!
Yes, so simple!
I have totally done this before. Roasted my own hazelnuts and then made my own spread. My kiddos were over the moon happy. BUT, it’s so much easier to purchase it – I’m lazy LOL!
Honestly, with a good blender–it is just as easy. Minutes for fresh stuff, I am in.
Oh my goodness! All my family goes crazy over this spread. I’ve never thought that is so easy and I need only few ingredients to make it. Looks fantastic!
Yes, just 4 ingredients!
I always love a good spread on my wheat bread. Never tried preparing spread here at home though. I would love to try your recipe. Looks yummy!
Simple and in minutes!
Are you kidding me?!??!!! I can MAKE my own hazelnuts spread that easy?! It is so expensive in the stores and full or preservatives. Thank you for sharing. My kids eat it all the time.
Girl, yes you can! My pleasure, it is worth every penny!
it’s so easy! thanks for the post.
My pleasure!
Okay, this is amazing! My mouth is watering just looking at the pictures!
It is so yummy.
This is so easy to make, wondering if it will turn out the same if omit the oil.
I am not quite sure but, it is what provides a bit of liquid.
So easy and would be delicious
Super easy!
yum! this totally looks right up my alley!
So delicious!
I can imagine that this would be so much better than storebought.
We love it!
I would love to try this sometime,looks delicious!
It is delicious!
Recipe looks great. Should I refrigerate it or is it ok to just store in my cupboard?
Hello Britton, thank you! Since there is no dairy in the recipe, you can store at room temp for a couple of weeks. Always check on it, of course. For more extended storage, a fridge is best. It may turn a bit hard but can be warmed to soften.