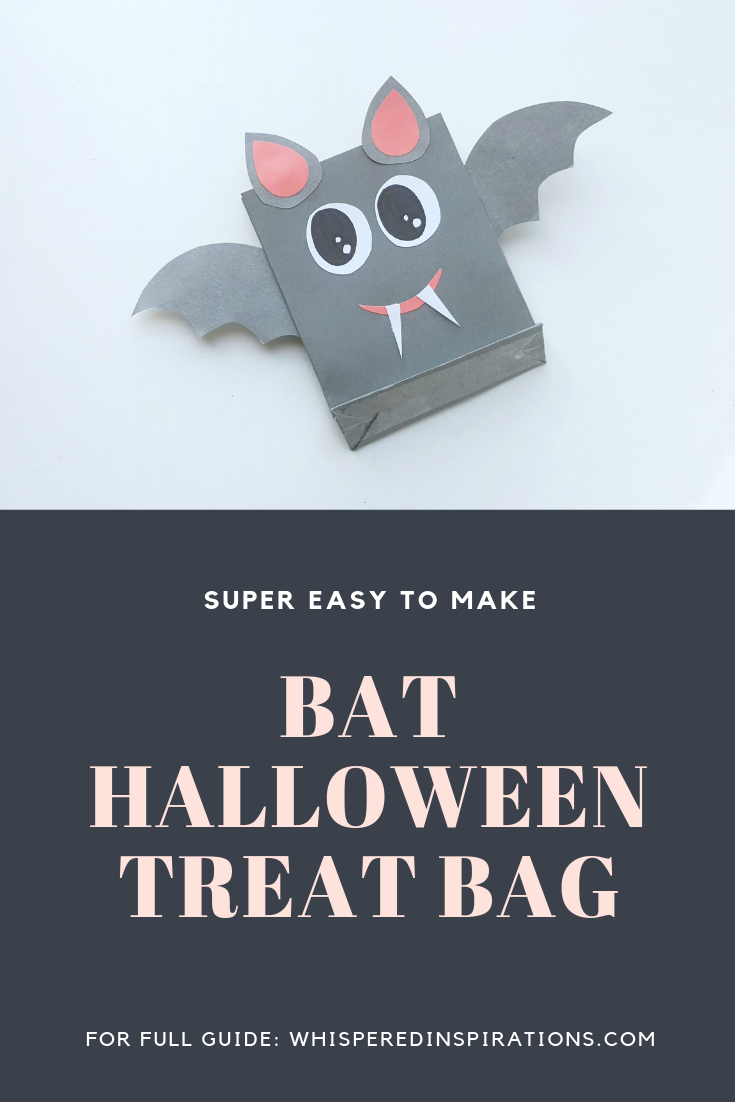
Super Easy to Make Bat Halloween Treat Bag

Halloween Treat Bags
During Halloween, kids look forward to getting dressed up and going trick-or-treating. Another thing they look forward to is enjoying treats at school, daycare, or parties.
There’s spooky music, fun activities, and there are always treat bags with delicious sweets.
If there’s something that kids love, it’s candy.
Looking for something festive to make with your kids, a craft for your students, or treat bags to give away? Look no further, I have a step-by-step guide to make this super cute Bat Halloween treat bag.
If you like this bat treat bag, you’ll love this Fun and Easy Mummy Halloween Craft for Kids, Easy and Silly Jack O’Lantern Rockets Halloween Treat Bags, and this Step-by-Step Paper Monsters Craft for Kids.
In other words, you’ll be really busy!
For now, read on for the step-by-step guide to make this super cute bat!

List of Supplies:
- Colored craft paper – black or grey or any colour of your choice
- White and pink coloured paper
- Craft glue
- Scissors
- Tape or Stapler
- Pencil – for tracing the template
- FREE Bat Template

Step 1:
Firstly, select a craft paper for the project and cut out a rectangular piece out of it. I chose gray and mine was 12.5-inch x 7 inch. By keeping the 0.5 inch intact; fold the 12 inch into half. Remember, you can choose any color you’d like!

Step 2:
Secondly, apply glue along the 0.5 inch part. Fold and stick the glued part with the other open end of the folded rectangular paper.

Step 3:
Fold up 2 inches of the current paper from any one of the open ends. Do not fold the closed ends.

Step 4:
By keeping the paper on a flat surface, open the bottom of it from one side. This will create a triangular pattern on the side.

Step 5:
Similarly, open the other side of the bottom and flatten the paper neatly. Now it has 2 open sides, like flaps.

Step 6:
Hold any one of the open sides and fold half of it downwards, slightly overlapping the center line.

Step 7:
Similarly, hold the other open side and fold half of it upwards, overlapping the previous side’s fold. Apply glue along the overlapped part to secure the bottom of the bag. Notice the 2 squares formed on both sides of the bottom.

Step 8:
Create crease along the along the sides (left and right). Match the opposite corners of the squares on the sides of the bottom part to make perfect crease lines along the left and right. This will create crease lines on both the front and back side of the bag and a center line for each pair of creases.

Step 9:
Unfold the folds created for the crease and carefully tuck the center line inwards. The open end can be secured by using clear tape or glue or staplers, whichever you prefer. Then the bag is ready!

Step 10:
Trace the patterns from the template on the selected craft papers and cut them out nicely. You can access the TEMPLATE and print it off.

Step 11:
Attach the wings on any one of the creases on the sides.

Step 12:
One by one attach the other details of the bat to complete the bag.
Allow the glue to dry.
Done!

Fill Those Bags
Now that you’ve made these adorable bat treat bags, you’re ready to fill them. You can fill them up with candies of all sorts, mini chocolates, pens, erasers, even coupons or vouchers for bigger treats. However, you can get as creative as you’d like with these.

Once they’re filled, they’re ready to be passed out for your child’s class, your annual Halloween party, or to the neighbourhood kids!
You May Also Like:
- Fun and Easy Mummy Halloween Craft for Kids
- Easy and Silly Jack O’Lantern Rockets Halloween Treat Bags
- Step-by-Step Paper Monsters Craft for Kids
- Spooky Halloween Décor Ideas for Your Eerie Interiors
- This Pokemon Squirtle Costume is Perfect for Halloween.
Above all, Halloween is one of the most fun holidays. We’re all about the candy!
What do you put in your Halloween treat bags?
Let me know, til then–cheers m’deres!

PIN FOR LATER:

Nancy Polanco is a freelance journalist, lifestyle content creator, and editor of Whispered Inspirations. She is a proud Mom to Gabby and Michaela and partner and best friend to Darasak. Having worked as part of a health care team for almost a decade, Nancy is happy to be back to her passion. She is a contributor to the Huffington Post, TODAY’s Parents, and an Oprah Magazine Brand Ambassador.


This would be fun to make a small version for treats for school on Halloween. Great idea and easy
Yes, you nailed it.
This is so adorable! This looks like such a fun craft to do with the kiddos this weekend.
Hope you have tons of fun.
OMG THIS IS BEYOND ADORABLE!!! I cannot get over it. I want one for myself 😉
Time to make them!
This is the cutest treat bag. I just love the bat. I might have to make these with my daughter. We’ve never done treat bags before.
Now you gotta!
That is very cool! You are definitely creative and I am definitely going to try this. It looks like it would be a fun project to do with my kiddo.
Hope you have fun!
Well, isn’t this just the cutest little thing! I think this would make a great treat bag for a Halloween class party.
Yes, they totally would!
I love the Halloween treat bag that you made! It’s so cute and looks like an easy project. I bet my kids would enjoy one of those for trick or treating!
Yes, they are great for a nice treat or as a party favor.
How cute are these? I love them for the kids’ classroom parties.
Yes, they would be perfect.
These are the cutest little treat bags. I love that they are not even that hard to make.
So simple!
I think kids of most ages would love making this bat treat bag! Holding candy is a definite bonus.
Yep, totally agree.
That is super cute! My girls would love it. I can totally hear they saying how much they love the “kawaii eyes”!
Hehe, they are kinda kawaii!
That’s an adorable bag. I make special bags for 4 of the neighbor kids on Halloween. They seem to still like it! I have to give these a go.
We do the same, these will definitely be a hit!
This craft is super cute and would be perfect for my niece’s kindergarten Halloween party!! I need to tell my sister about this!!
Awesome, these are just the thing you need.
Such an artsy treat bag you have created. You gave me an idea for my children’s treat bag for school.
Awesome, enjoy.
When my kids were little we made things like this. I miss those days so much. Thank you so much for the reminder. I will pass this along to my teacher friends.
Awww, I miss those days too. Thanks for sharing!
Awe that is a really cute DIY! This is a great one for the kids to do!
Yes, they will love it!
That bag is so cute. I think I saw this somewhere and actually pinned it. My son would love to help make that.
Awesome, thanks for sharing it!
I love this! Always looking for a way to make the treats a little more special for the kids to give to their friends. A cute little bag is perfect for this year!
Yes, I completely agree.
This is adorable! My youngest daughter is three years old and would have so much fun with this craft. I’m definitely going to set aside some time to make this with her this weekend.
Aww, that is awesome. Hope she had a good time.
Ohh this is so nice. Just in time for the Halloween party that kids are looking forward to. Indeed this is a perfect Halloween treats bag. Thanks for the idea and sharing it to your readers.
Awesome, my pleasure.
Going to try this on the weekend,even if we just make one it will be fun!
Happy Halloween,We made these yesterday and they looked nothing like yours,but it was a great day of fun and giggles!
Aww, so happy that you liked them.
Oh my gosh, this is the cutest bag. I need to make it with my kids.
Hope you guys have fun!
It is super cute for Halloween. My granddaughters will all love making this over the weekend.
SO much fun!
I pinned this post to come back to as me and my God Dauighter will have a blast making this treat bag! So cute and adorable and nothing better than crfting with the kids to mkae adorable items like these! I so love it…. it is stinking cute!
Awww, I hoe you guys have a great time.
These bat-themed Halloween treat bags are adorable and super easy to make. Perfect for spooky fun!
Yes, they are so darn cute.
This Halloween Treat Bag is super cute! Making the bat seems simple enough (even for me!) and I know little ones would love it.
Yes, so simple~
My kids are going to love making these for their Halloween party this year.
Aww, I hope they like them.