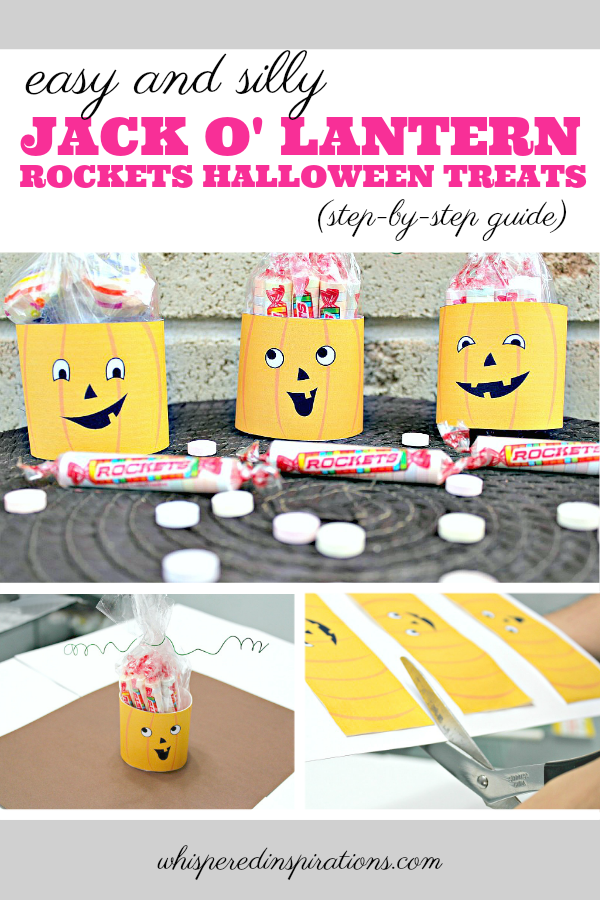
Easy and Silly Jack O’Lantern Rockets Halloween Treat Bags

Super Easy Rockets Treat Bags!
They kind of, well, rock. That’s right folks, you know when you see Rockets Candy in stores and simply pick up the bag, you can smell that delicious and most nostalgic smell through the bag. Well, when you do that, you know Halloween is right around the corner!
Fun fact: Did you know that in the US, Rockets are called Smarties? Last year, I visited my cousins in Florida and decided to bring them our version of Smarties since they’ve never tried them!
Every year we make things for Gabby’s class. Almost always, we send along Halloween themed cupcakes and treats if the teacher allows. I had the opportunity to make a simple, easy and quite tasty I might add, craft. One that ANYONE can make!


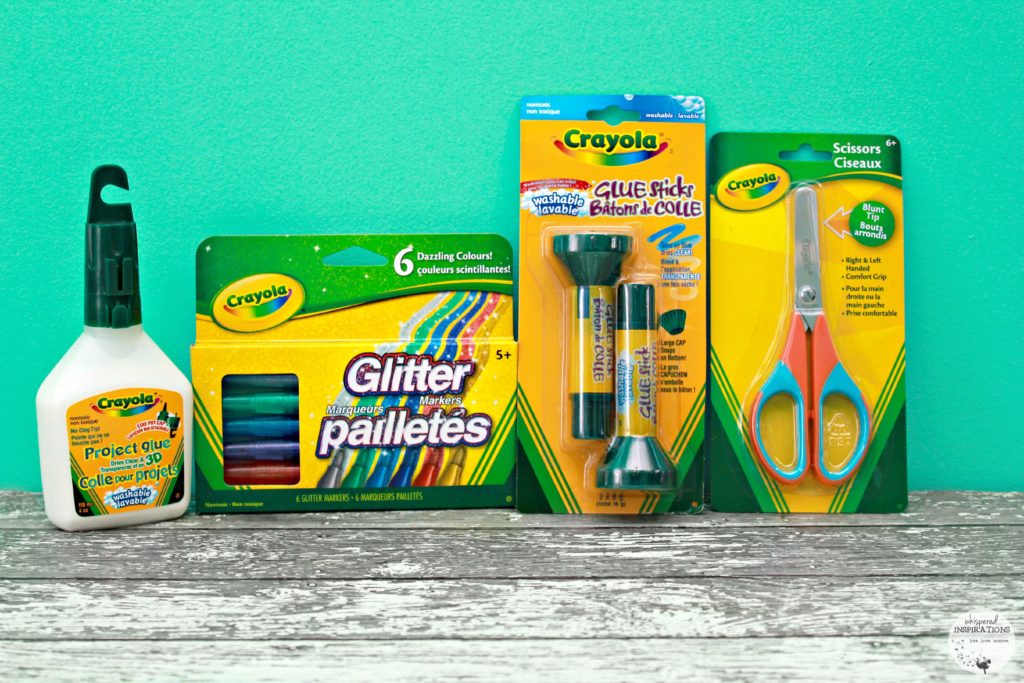
You Will Need:
- 8.5-by-11-inch card stock
- Scissors or Pinking Shears
- Double Sided Tape
- Brown or Green Floral Wire (cloth covered OK too)
- Pencil
- Assorted Rockets Halloween Candy
- Clear cellophane
- Clear elastics

Step 1: Print and Cut
First thing is first, get your hands on some delicious Rockets! You can find them at your local Dollarama, Walmart and Costco. Next, you simply print out this Jack O’ Lantern clip art on a 8½-by-11-inch card stock and print it out. That way they are thick enough to be sturdy enough to hold your Rockets treats!
Cut out your Silly Rockets Jack O’ Lanterns and if you’d like a more funky shape, use the pinking shears to cut the top of the Jacks. I decided to leave mine straight.

Step 2: Cut Cellophane, Secure, and Wrap
Normally using cellophane bags would be the easy route but since Rockets come in all fun sizes, you have to custom make the baggies. So, cut out the cellophane in squares that match the height and width of your Rockets treats. Secure the treats by using an elastic, it won’t be seen since it will be covered. Place treats in the center of the square and gather it to the top until you’ve made a closed and secure bag over the Rockets Candy. Use a clear elastic to secure the bag.

Step 3: Tape it, Place it and Do a Wrap Around
Once you have finished your treat bags, grab your double sided tape and attach a piece that runs the length of the Jack O’ Lantern and place the treat bag in the center, then wrap the two ends around the bag so that both ends line up neatly in the back.

Step 4: Wind it UP
Grab your pencil, floral wire and start winding your wire around the pencil, remove the wire and stretch it out to your liking. Place the wire around the top of the bag covering the clear elastic.

Step 5: Wrap the Stem
Once you add the wire stem, you are done! Get ready to hand these out to your neighborhood kids, your kid’s classrooms or as Halloween Party favors!

Now Enjoy!
I hope you liked this super easy tutorial and what’s best is that they are filled with an all-time classic and favorite Halloween treat, Rockets! If you want to see the latest from them, visit Rockets Candy and see what’s up! You can also follow @rocketstweets and like them on FB, here.
You May Also Like:
- Super Easy to Make Bat Halloween Treat Bag
- Fun and Easy Mummy Halloween Craft for Kids
- Spooky Halloween Décor Ideas for Your Eerie Interiors
- Halloween Memories in 2010
Have Fun!
I know that any kid would love getting a treat like this and kids sure do love Rockets! Gabby and her friends here in the neighborhood have sure enjoyed them!
If you’d like, follow our day-to-day adventures at @whispersinspire on IG.
Do you ever give out Halloween treat bags to your neighborhood kids?
Let me know, til next time, cheers m’deres!

PIN FOR LATER:
Note: Originally posted on October 4, 2012.

Nancy Polanco is a freelance journalist, lifestyle content creator, and editor of Whispered Inspirations. She is a proud Mom to Gabby and Michaela and partner and best friend to Darasak. Having worked as part of a health care team for almost a decade, Nancy is happy to be back to her passion. She is a contributor to the Huffington Post, TODAY’s Parents, and an Oprah Magazine Brand Ambassador.
We love the Double Lollies here.
Definitely the Double Lollies! Those were my favorite when i was a kid!
Double Lollies too! I didn't even know they were Rockets.
My recent post #Book #Review: Chicken Soup for the Soul: Say Goodbye to Stress
Cute craft project and idea for Halloween!
My recent post Week Thirty Nine of Project Happy: One Year Blogiversary
Oh wow! What an amazing post. Great ideas for this coming week. Now, I would say Super Assortment would be our fave.
I love the regular ones and giant rockets the best! Yum!
My recent post Falling Asleep Behind the Wheel More Common Than You Think
oh my gosh N! You are soooo creative! LOVE what you did! 🙂
My recent post A Fall Country Drive in SW Ontario – photos
The Love Hearts are my fave
I love the normal rockets rolled candy
I love the original Rockets and the Double Lollies
Double Lollies
I love the double lollies but my boys like the giant rockets or the regular size ones. Since they have allergies rockets are one of the few candies they can eat so the totally ROCK at our house! (and they are what I exchange a lot of their halloween candy for)
My recent post A Little Lunchtime Love – Bento Monster
I love the regular rockets
thanks
We love the Rockets and Double Lollies in our house. The manufacturing facility is about 10 minutes from where I'm sitting right now and 10 mins from my house….just across the street from the Mars plant too! 🙂
Oh…it's the Canadian Facility that I'm near. 🙂
WOW, that\’s so COOL!
my favorite is love hearts
Spearmint Breathsavers – Denise G
ontariohappychick at gmail dot com
My recent post Friday Giveaway Linky – Come List Your Giveaways & Enter Some Too
Such a cute idea! Love the printable!
Thank-you! It was tons of fun! 🙂
Regular Rockets all the way! I make sure we save a stash for ourselves!
My recent post Pregnancy Update – 33 Weeks
Rockets Mega Double Lollies are my favorites! So yummy!!
My favourite is Rockets®, the classic!
i LOVE the regular rockets! i used to shave it to make it into powder lol
These look delicious! Giant Rockets® Rolls
I love the Rockets! (I didn't know they made GIANT Rocket Rolls! Will be on the lookout!)
They do and they are even bigger awesomeness!
I like the Super Double Lollies.
Double Lollies for sure!! yum!
The Rockets Love Hearts.
I will be bookmarking these for the season,they are so cute !
Rockets are my all time favorite Halloween candy
They are one of mine too!
I can’t believe it’s the season for trick or treating again,looking forward to the yummy rockets
awe how cute are those little goodie bags! And i love how easy they are to make too. You don’t need many supplies and simple and fun for the little ones to do
Hehe, yeah… they really are cute.
Think we will make these this year! So cute!
Thanks Kathy!